
 |
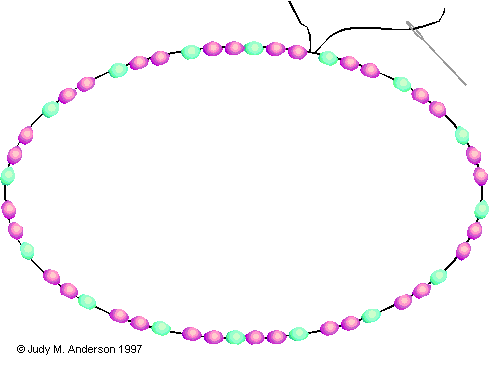
String on two main color beads and one accent bead. Continue until you have a total of 16 accent beads (with two main color beads between them). Tie this into a circle using a square knot. Not too tight! You need a little room to get your needle in and out--about one bead-width should do nicely. |
 |
Go through the accent bead next to the knot and string on
five (5) main color beads and one accent beads. Continue stringing 5 main color and
1 accent until you have 13 sets of 5 main color beads (don't put on the last accent
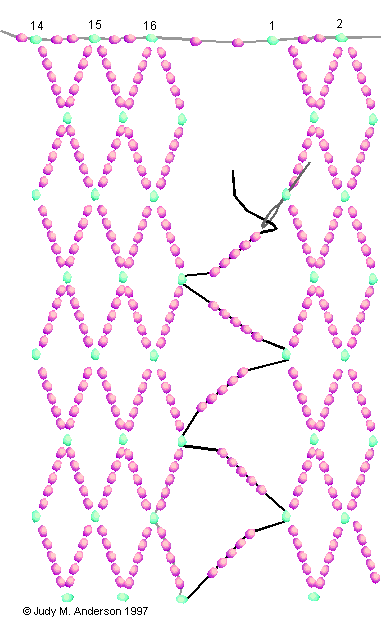
bead!). Now, with the circle of beads at the top of your work surface and the thread pointing toward the bottom, go back through the 4th accent bead from the bottom. (See picture on the left.) String five main color, one accent, and five more main color (5-1-5). Now skip the accent bead next to the one you just exited and go throug the next one (just like the diagram on the left!). Keep adding (5-1-5) and going through ever other accent bead until you go through the bead next to the circle (hint: if you didn't come through the top bead next to the circle, your initial count was off). Add five main color beads and go through the next accent bead in the top circle. Now, string (5-1-5) and head back down, this time going through the accent bead in the (5-1-5) groupings you just added--see the purple arrow? When you go through the last accent bead on the way down, you'll add three sets of five instead of two (5-1-5-1-5), then come back up to the "loop" above the last accent bead you went though. Doing OK? It's all repetition from here, until you get to the last accent bead. |
|
 |
Nearly there! When you've nearly completed your netting
and you're just heading down toward the bottom away from the 16th (final) accent bead, you
change your routine just a bit. At the bottom, add (5-1-5) instead of adding
(5-1-5-1-5) as you have been. You're ready to zip it up! At this point, you're
scratching your head, trying to follow along with these directions, and you should
have the (5-1-5) on your thread. Go up through the accent bead in the
"loop" at the bottom of the first row. The picture on the left shows you
where to go. Add five main color beads and go through the accent bead on the 16th
row. Back and forth, you'll "zip" your netting closed. When you get
to the top, go through the first accent bead again and tie off your thread and weave in
those ends. You did it! Oh....but you're not done yet. You could be. I had one student who just draped hers over a bulb and liked it that way. If you want to do yours like mine, though, keep beading! Slip the netting over the bulb. It should reach nearlly to the bottom (at least 3/4). You may have to play with this part, depending on the size of the beads you used. If your netting goes almost to the bottom, try closing it up by just tying on a thread and going through all the accent beads at the bottoms of the loops. If it goes more than 3/4ths of the way, try adding two or three beads between each accent bead. This is where some pulling takes place. You want that netting snug over the bulb. If your netting doesn't make it 3/4ths of the way, you're gonna have to close it a different way altogether--but that looks cool, too. I'll cover that in the problem-solving section. The look you want here is a smooth netting over the beads. The bottom shouldn't be gappy or ruffled (unless you like the way it looks--then leave it!). |
Ready to embellish? What I usually do is "dangle" my embellishments from an accent bead either at or just below the widest part of the ornament. I tie on above my planned embellishment line, then weave down to the accent bead. Go through it and add 12-20 beads (depends on their size and the look you want), then special bead of some type. Crystals, teardrops, fringe beads, and Miracle beads all work well, as do semi-precious stones and chips. Now put a "stopper" bead at the bottom and go back up through the dangle. Weave up and down through the fringe to the site of your next "dangle." Remember, there are 16 accent beads in every row around the ornament. On one ornament, I used about 3/4 inch of main color, a small Swarovski the same color as the accents, and one bead for the "turnaround."
Problem solving:
These ornaments look great hanging on the tree and catch the lights very dramatically! Try mixing "textures." Take one of those pearly ornaments they make now and use a silver-lined matte-finish bead with some metallic cut beads as accents. Try iridescent or rainbow beads with matte accents over a matte ornament. My favorite is one I made with matte-finish "clear" beads and AB-finish clear beads over a clear ornament. On that one, I didn't make any dangles, but I did make swoopy festoons (string about 40 beads and gro from an accent bead sideways skipping one or more and going into the next one. Make sure it drapes and make sure you'll "come out even" at the end--then go around again with MORE beads (50?) to make a double row of drapes. I added tiny AB teardrops to the lower "festoon". I used 12/0 beads for that ornament, so I used 18 accent beads in my base row.
Another look I like is to use larger beads for the accent beads...like freshwater pearls, or size 9/0 cut beads.
Whew! There you have it. That's how I do it. Now, if you'd like, you can meander to my Photo album to see some really bad pictures of some of the ornaments I've made. I discovered it's hard to use a closeup filter on a round item with a shutter-priority camera. I'll try to get some better photos scanned as soon as I take them.